Calibrating your camera
From ARToolworks support library
Main Page > ARToolKit Professional > Calibrating your camera
Note: This page refers to the camera calibration procedure introduced with ARToolKit Professional v4.3. If you wish to refer to the procedure for previous versions, please see the page Calibrating your camera (versions 4.0-4.1)
Contents |
Introduction
In the ARToolKit software, default camera properties are contained in the camera parameter file camera_para.dat, that is read in each time an application is started. The parameters should be sufficient for a wide range of different cameras. However using a very simple camera calibration technique it is possible to generate a separate parameter file for the specific cameras that are being used. In a video-see through AR interface, if the camera parameters are known then the video image can be warped to remove camera distortions. This page presents how use utility programs included with ARToolKit to calibrate your video camera.
Setting up
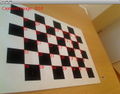
Calibration works by capturing images of the pre-prepared calibration pattern with the camera. The calibration pattern is in the file "Calibration chessboard.pdf" contained in the doc/patterns directory inside your ARToolKit Pro distribution. This PDF is designed to be printed on A4 paper. If printing on US Letter paper, you should choose to crop the PDF rather than scale it to fit the smaller paper size.
Once printed, the pattern must be affixed to a flat surface. The easiest means of doing this is to use a piece of thin flat board (as might be obtained from a hardware store) and a dry glue. Using a millimeter rule, measure the size of the edges of the squares. If printed without scaling, this distance will be exactly 30 mm. Other sizes can be used, as long as they are accurately known.Finally, set up your camera. A calibration file is only valid for one focus setting of the camera (although it will still work at other focal lengths), so choose in advance the focus setting for the camera which will be used most often.
How it works
The "Calibration pattern.pdf" image consists of a grid of black and white squares surrounded by a white border. When viewed through the camera lens, lens distortion causes the straight lines at the edges of the squares to appear curved. The calib_camera program uses the OpenCV library to locate the corners of the squares and then measures the spacing between the corners and uses this information to calculate the lens distortion. The more images captured, the lower the error in the distortion measurement.
Running calib_camera
How to launch the program
Open a command promp (on Windows, choose "Run" from the Start menu, type "cmd", or on Mac OS X / Linux, open a Terminal window). Run the calib_camera program from the command prompt. Typecalib_camera.exeon Windows, or
./calib_cameraon Mac OS X / Linux. You will see output similar to this in your terminal:
./calib_camera
CHESSBOARD_CORNER_NUM_X = 7
CHESSBOARD_CORNER_NUM_Y = 5
CHESSBOARD_PATTERN_WIDTH = 30.000000
CALIB_IMAGE_NUM = 10
Video parameter:
Using default video config.
Image size (x,y) = (640,480)
At this point, you should see the image from the camera appear.
If you need to change the default calibration pattern settings
The size of the calibration squares, the number of intermediate corners in horizontal and vertical directions (i.e. the number of rows minus 1 and the number of columns minus 1), and the number of calibration images captured can all be adjusted from the command line. Running the utility with the -help option will show the various command-line options for adjusting the default calibration settings. e.g. (Mac OS X/Linux):./calib_camera -helpor (Windows)
calib_camera.exe -help
The help text is reproduced here:
Usage: calib_camera [options] [Video config parameters]
Options:
  -cornerx=n: specify the number of corners on chessboard in X direction.
  -cornery=n: specify the number of corners on chessboard in Y direction.
  -imagenum=n: specify the number of images captured for calibration.
  -pattwidth=n: specify the square width in the chessbaord.
  -help: show this messages
If you need to specify options for the video configuration
In addition to command-line options for controlling the calibration pattern settings, a video configuration can also be specified on the command line, allowing you to choose a video format and/or image size, if your camera supports those options.
E.g., this invocation on Mac OS X requests the image from the camera be scaled to 640x480.
./calib_camera "-width=640 -height=480"
If you use the video configuration to select a video size different from that which will be used later, be sure to maintain the same proportions between the width and the height. For example, a 4:3 image of 1600x1200 pixels can be scaled to 800x600 or 640x480, whereas a 16:9 image of 1920x1080 image can be scaled to 860x540.
Capturing calibration images
Calibration requires the capturing of a series of images. In the top-left corner of the capture window is displayed the number of images captured so far. Point the camera at the chessboard grid, and the inner corners of the squares will be highlighted with "X" marks and numbered. When the camera can clearly see all the intermediate corners, the X marks turn RED, and a calibration image can be captured:
If some of the corners are obscured by the edges of the camera frame, or poor lighting or reflection, the crosses will be GREEN, and no calibration image can be captured until the optical conditions are changed.
At this point, you should press the space bar on the keyboard. The image will be captured, and the locations of the X points will be printed to the terminal window, and the counter will increment.
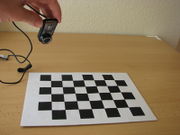
In order to obtain a good calibration for the camera, it is important to obtain images of the calibration board at a variety of angles to the camera lens. The images below give examples of the configurations of the calibration board you should try to obtain. Note that these involve holding the camera at different angles to the board, including upside-down.
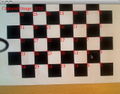 |
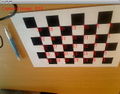 |
|
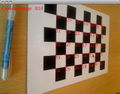 |
 |
Once all the calibration images have been captured (10 by default), the calibration data will be output to the terminal window, and you will be prompted for a file name for the calibration data:
--------------------------------------
SIZE = 640, 480
Distortion factor: k1=-0.064153, k2=0.000674, p1=-0.003693, p2=-0.011219
                  fx=6819.694824, fy=4906.716797, x0=-13355.703125, y0=1494.664429, s=-0.891334
-7651.11364 -0.00000 -13355.70312 0.00000
-0.00000 -5504.91609 1494.66443 0.00000
0.00000 0.00000 1.00000 0.00000
--------------------------------------
Err[ 1]: 0.384557[pixel]
Err[ 2]: 0.637637[pixel]
Err[ 3]: 0.605374[pixel]
Err[ 4]: 0.517292[pixel]
Err[ 5]: 0.730103[pixel]
Err[ 6]: 0.560028[pixel]
Err[ 7]: 0.586818[pixel]
Err[ 8]: 0.501263[pixel]
Err[ 9]: 0.437201[pixel]
Err[10]: 0.385920[pixel]
Filename[camera_para.dat]:
If the calibration data is good, there should be very low estimated error in each image: hopefully, less than 1 pixel. Error greater than 2 pixels indicates a poor calibration, and it should be abandoned and restarted.
At this point, you can press return or enter on the keyboard to save the data in a file named "camera_para.dat".
Using the calibration data
To use your new calibration file, just replace the default camera_para.dat file in ARToolKit's bin/Data directory with your newly saved data.
It can be helpful to keep a collection of camera_para.dat files for cameras you commonly use.
That's it!
That's all there is to it. This new calibration procedure takes only a minute, and should be fast enough that you can recalibrate your camera any time you change its focus or zoom. With good calibration, you'll see much improved tracking in ARToolKit.
Stereo camera calibration
If calibrating a stereo camera, calibrate each eye separtely first, saving the parameters, then run the program calib_stereo to perform the final step of inter-occular calibration.
