Installing and building osgART
From ARToolworks support library
Main Page > osgART > Installing and building osgART
The information on this page relates to the current version of osgART, version 1.1. For information relating to earlier versions, please see the page Installing and building osgART (older versions).
Contents |
Building osgART from source
If you have been supplied with pre-built osgART binaries, you will not need to build osgART, and can skip to the next section. However, it is useful to build osgART to change various options and to add your own customisations.
Prerequisites
See Required software.
Specifying the location of ARToolKit
When using ARToolKit, ARToolKit4, or ARToolKitNFT for video capture and/or tracking, you will need to set up environment variables so that the osgART project files knows where to find the directories containing these files. We define an environment variable named ARTOOLKIT_2_ROOT pointing to where the ARToolKit folder is, and if using ARToolKit Professional, another environment variable ARTOOLKIT_4_ROOT pointing to the ARToolKit4 folder, and if using ARToolKit NFT, yet another environment variable ARTOOLKIT_NFT_ROOT.
Windows
These environment variables are set up by the ARToolKit installer packages. You can check their correctness or set them manually by opening the System control panel, clicking the "Environment variables" button on the "Advanced" pane, and defining or editing the settings for the current user, or system wide.
 Open the system control panel |
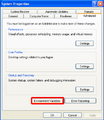 Click the environment variables button |
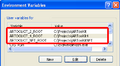 Enter the environment variables above (changing the paths to point to where you installed ARToolKit. |
Linux
The easiest way to set these environment variables is to run the artoolkit-setenv, artoolkit4-setenv, and artoolkitnft-setenv scripts which can be found inside the share/ directory of the ARToolKit distributions.
Mac OS X
The ARToolKit environment variables can be set either by running the artoolkit-setenv, artoolkit4-setenv, and artoolkitnft-setenv scripts which can be found inside the share/ directory of the ARToolKit distributions, or by manually defining the build settings ARTOOLKIT_2_ROOT, ARTOOLKIT_4_ROOT, and ARTOOLKIT_NFT_ROOT in the Xcode targets inside the osgART Xcode project file.
Compiling
Windows (Visual Studio)
Build files for Visual Studio are located inside folders named after the compiler version, inside the folder VisualStudio at the top level of the osgART distribution.
The main solution file to open is named osgART.sln. Choose "Build solution" to build the video and tracker plugins, osgART itself and the test example.
The example applications are built through a separate file named examples.sln.
Mac OS X (Xcode)
- Unpack the archive to a convenient location, and open the file
osgART.xcodeprojlocated inside the folderXcodeat the top level of the osgART distribution. - Click "Build" from within Xcode. The targets required to build osgART will be built in the correct order.
Linux (gcc)
unpack osgART into a local folder (e.g. /home/thatsme/Projects/osgART)
$> tar xfzj osgART-x.x.tar.bz2
you unpacked osgART into /home/thatsme/Projects/osgART
$> cd /home/thatsme/Projects/osgART/bin
You need to know where artoolkit is installed and start make
$> gmake
For using the same build system as osgART you need bakefile. You can copy the original bakefile to a new one and add another target for your application. $> cd /home/thatsme/Projects/osgART/bin $> cp osgART.bkl MyosgART.bkl You need to edit the bakefile for making changes to the source and include directories of your project. Additionally you need to regenerate the makefile from the bakefile.
$> bakefile -f gnu MyosgART.bkl
Post-installation tasks
Windows
Copy any required DLLs from ARToolKit(s) into the osgART/bin directory. For ARToolKit v2.x, this will include libARvideo.dll, DSVL.dll. For ARToolKit v4.x, this will include ARvideo.dll, pthreadVC2.dll.
Running the example(s)
Windows
Linux
Ensure the ARTOOLKIT_CONFIG and/or ARTOOLKIT_4_CONFIG environment variables are set correctly for the videocapture you are using. For example using GStreamer with the TV testsignal simulator you can use:
	$> echo $ARTOOLKIT_CONFIG
	videotestsrc ! identity name=artoolkit ! fakesink
or for using Video4Linux it should read something like this:
	$> echo $ARTOOLKIT_CONFIG
	-dev=/dev/video0 -width=320 -height=240 -palette=YUV420P
Please consult the ARToolKit documentation for more information how to set up video capture correctly. To run the examples the runtime linker needs to be able to load the plugins from the osgART directory. For example in a bash shell:
$> export LD_LIBRARY_PATH=".:$LD_LIBRARY_PATH"
run the test example
$> ./osgARTTest