Installing ARToolKit Professional
From ARToolworks support library
Main Page > ARToolKit Professional > Installing ARToolKit Professional
Main Page > osgART > Installing ARToolKit Professional
If you have been supplied with pre-built ARToolKit 4 binaries, you will not need to build ARToolKit, and therefore installation will consist merely of placing the ARToolKit package in a location of your choice. However, it is useful to build ARToolKit 4 to change various options and to add your own customisations, so be sure to attempt it some time.
Contents |
Required software/source packages
- A compiler.
- Windows: Microsoft Visual Studio 2005 and Visual Studio .NET 2003 are supported. The free Microsoft Visual Studio 2005 Express Edition will also work.
- Mac OS X: Xcode tools v2.2 or later is required. These may be obtained free from Apple at http://developer.apple.com/tools/xcode/.
- Linux: GCC 4.0 is recommended.
- OpenGL
- GLUT; required to build libARgsub and the utilities and examples. (libARgsub_lite provides equivalent functionality to libARgsub without requiring GLUT).
- Windows: [1]
- Mac OS X: included in OS.
- Linux: GLUT may be available as an RPM in your distribution. E.g. in Ubuntu Linux, install the package "freeglut-dev". Otherwise, GLUT is included in the MESA 3D libraries: [2]
- OpenCV; required to build calib_camera.
- Windows: http://downloads.sourceforge.net/opencvlibrary/OpenCV_1.0.exe
- Mac OS X: Mark Asbach has created OpenCV binaries for Macintosh in the form of a Private Framework, and this is the OpenCV variant supported by ARToolKit Professional. Click here to download Mark Asbach's OpenCV binary for Macintosh. Once downloaded, create a folder inside your ARToolKit folder named "Frameworks" and drag OpenCV.framework into it.
- Linux: http://downloads.sourceforge.net/project/opencvlibrary/opencv-linux/1.0/opencv-1.0.0.tar.gz (Hint: download with the terminal command "curl -LO ttp://downloads.sourceforge.net/project/opencvlibrary/opencv-linux/1.0/opencv-1.0.0.tar.gz")
- A video capture source
- Windows: By default, on Windows ARToolKit Professional's video library (libARvideo) uses Microsoft's DirectShow as a video source. Unfortunately, this requires installation of the DirectX SDK and either the Windows SDK or the DirectShow package from the Microsoft Platform SDK to compile libARvideo. Please see the separate page Building libARvideo using DirectShow. Alternative video sources on Windows include:
- QuickTime, either using the VideoDigitizer or movie files or streams. Please see the separate page Building libARvideo using QuickTime.
- Thomas Pintaric's DSVideoLib which is the default video source for ARToolKit v2.x (N.B.: DSVideoLib is GPL-licensed and therefore cannot be used in proprietary software)
- Point Grey's flycapture SDK (only for use with Point Grey Cameras).
- Canon's HDCam64 camera control library (Canon HDCam64 users only).
- Mac OS X: QuickTime v6.4 or later is required, and is included in all versions of Mac OS X > 10.3.
- Linux: Video4Linux, lib1394dc, or GStreamer is required. The corresponding packages required to be installed in your package manager are "libv4l2-dev", "libdc1394-22-dev" (for lib1394 version 2.x) or "libdc1394-13-dev" (for lib1394 version 1.x), and "libgstreamer0.10-dev".
- Windows: By default, on Windows ARToolKit Professional's video library (libARvideo) uses Microsoft's DirectShow as a video source. Unfortunately, this requires installation of the DirectX SDK and either the Windows SDK or the DirectShow package from the Microsoft Platform SDK to compile libARvideo. Please see the separate page Building libARvideo using DirectShow. Alternative video sources on Windows include:
- OpenVRML (optional); The ARToolKit VRML renderer requires OpenVRML.
- Windows: OpenVRML-0.16.6 or later (for Visual Studio 2005) or OpenVRML-0.14.3 (for Visual Studio .NET 2003) must be on the include and library path to rebuild ARvrml.lib. Suitable binaries of OpenVRML for Windows can be downloaded from http://www.artoolworks.com/dist/openvrml/.
- Mac OS X: OpenVRML should be installed using the Fink packagemanager. Once fink is installed, the required command to install OpenVRML is
fink -b install openvrml6-dev openvrml-gl6-dev. Alternately, a Universal binary build of OpenVRML-0.16.6 suitable for inclusion in application bundles can be downloaded from http://www.artoolworks.com/dist/openvrml/. - Linux: Binary deb packages are available from http://www.openvrml.org/.
Building ARToolKit Professional
Windows
- After unpacking ARToolKit, run the configure-win32 script. This generates AR/config.h for Windows builds. If you wish to change the default video library, or enable extra video libraries such as QuickTime, edit the file include/AR/config.h. See the additional help pages Building libARvideo using DirectShow and Building libARvideo using QuickTime for more help.
- Open the ARToolKit4.sln file inside the appropriate directory in side the "VisualStudio" directory.
- Build the ToolKit and the sample applications. The VRML renderer is optional, and is not built by default.
Mac OS X
- Open the ARToolKit4.xcodeproj, found inside the Xcode folder.
- The configure step (which creates AR/config.h) will be run automatically during the build process, but the defaults can be overridden by manually editing config.h if required.
- Select a target to build. The default target builds the complete toolkit with the exception of the OpenVRML-dependent projects.
Linux
- Building proceeds with the usual steps
./configure; makeDuring the configure process, you will be asked to select video libraries to build against.
Post-build steps
Running the simpleLite example
ARToolKit Professional includes a variety of examples demonstrating ARToolKit programming techniques. After compiling, the executables for these applications can be found in the bin directory inside your ARToolKit directory.
The simpleLite example is the most straightforward example. It can be run to test your ARToolKit installation is functioning correctly.
An explanation of the sourcecode of this example can be found on the page ARToolKit tutorial 1: First simple ARToolKit scene. More detailed information about the techniques demonstrated in each example can be found on the page ARToolKit Professional examples.
Windows:
simpleLite can be opened by double-clicking its icon in the ARToolKit4\bin directory. Alternately, you can run it from the command line:
- Open a command-line window (cmd.exe).
- Navigate to your ARToolKit4\bin directory.
- Type: simpleLite.exe
Mac OS X:
- Bundled applications are generated for the examples. The utilities are generated as command-line tools. Both can be run in the Finder (with output in Console) or from within Xcode or a Terminal window.
Linux:
- simpleLite can be launched from a terminal window thus:
./simpleLite
Setting up the ARTOOLKIT_4_ROOT environment variable
As there is no recommended directory into which ARToolKit's binaries (libraries, utilities and examples) must be placed, you can decide where to move ARToolKit to after compilation. However, if you are building other software that depends on ARToolKit Professional (e.g. osgART Professional Edition), it is recommended that you create an environment variable that points to the ARToolKit Professional directory root, so that it can be automatically located.
Windows
 Open the system control panel |
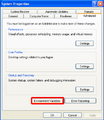 Click the environment variables button |
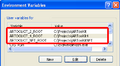 Enter the environment variables above (changing the paths to point to where you installed ARToolKit. |
Mac OS X
- Environment variables can be set from a Terminal window.
- From a terminal window, type the following lines, replacing "/path/to/artoolkit" with the actual path:
echo "ARTOOLKIT_4_ROOT=/path/to/artoolkit; export ARTOOLKIT_4_ROOT" >> ~/.profile
echo "setenv ARTOOLKIT_4_ROOT /path/to/artoolkit" >> ~/.cshrc
defaults write ~/.MacOSX/environment ARTOOLKIT_4_ROOT -string "/path/to/artoolkit"; plutil -convert xml1 ~/.MacOSX/environment.plist
The first line sets the environment for users with users with sh or bash as their shell, the second for users with csh or tcsh as their shell, and the third for programs launched by the Finder (including Xcode).
Linux
- Environment variables can be set from a Terminal window.
- From a terminal window, type the following lines, replacing "/path/to/artoolkit" with the actual path:
echo "ARTOOLKIT_4_ROOT=/path/to/artoolkit; export ARTOOLKIT_4_ROOT" >> ~/.profile
echo "setenv ARTOOLKIT_4_ROOT /path/to/artoolkit" >> ~/.cshrc
The first line sets the environment for users with users with sh or bash as their shell, the second for users with csh or tcsh as their shell. Note that ~/.profile is only read for login shells. If you prefer to use an interactive non-login bash shell, then add the following line:
echo "ARTOOLKIT_4_ROOT=/path/to/artoolkit; export ARTOOLKIT_4_ROOT" >> ~/.bashrc
