How ARToolKit works
From ARToolworks support library
Main Page > ARToolKit Professional > How ARToolKit works
Contents |
Basic Principles
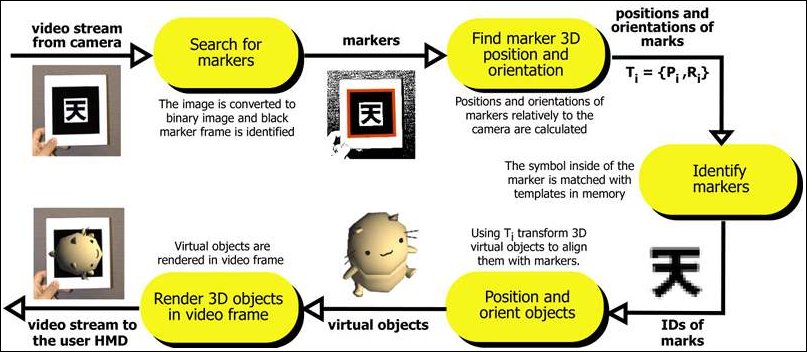
ARToolKit applications allow virtual imagery to be superimposed over live video of the environment. Although this appears magical, the secret is in the black squares used as tracking markers. The ARToolKit tracking works as follows:
- The camera captures video of the environment and sends it to the computer.
- Software on the computer searches through each video frame for any square shapes.
- If a square is found, the software uses some mathematics to calculate the position of the camera relative to the black square.
- Once the position of the camera is known a computer graphics model is drawn from that same position.
- This model is drawn on top of the video of the real world and so appears attached to the square marker.
- The final output is shown back in the handheld display, so when the user looks through the display they see graphics overlaid on the real world.
The figure below summarizes these steps. ARToolKit is able to perform this camera tracking in real time, ensuring that the virtual objects always appear overlaid on the tracking markers.
Limitations
While vision-based tracking is exciting in enabling so many applications, there are limitations which affect ARToolKit and other vision based systems.
Occlusion
Naturally the virtual objects will only appear when the tracking marks are in view. This may limit the size or movement of the virtual objects. It also means that if users cover up part of the pattern with their hands or other objects the virtual object will disappear. Also, if the marker borders move outside the camera frame, the marker will be clipped at the edge of the camera frame, and having more than 4 corners will fail to be recognised.
Range
There are also range issues in optical tracking, since as marker move further away from the camera, they occupy fewer pixels in the camera display, and there may be insufficient detail for the tracking to correctly identify the pattern. The larger the physical pattern the further away the pattern can be detected and so the great volume the user can be tracked in.
Table 1 shows some typical maximum ranges for square markers of different sizes. These results were gathered by making maker patterns of a range of different sizes (length on a side), placing them perpendicular to the camera and moving the camera back until the virtual objects on the squares disappeared.
| Pattern Size (inches) | Usable Range (inches) |
|---|---|
| 2.75 | 16 |
| 3.50 | 25 |
| 4.25 | 34 |
| 7.37 | 50 |
In order to increase the usable range, choosing patterns with lower complexity will help. Patterns with large black and white regions (i.e. low frequency patterns) are the most effective. Replacing the 4.25 inch square pattern used above, with a pattern of the same size but much more complexity, reduced the tracking range from 34 to 15 inches.
An alternative to using template markers (markers with user-defined tracking patterns in the interior) is available in ARToolKit Professional; 2D-barcode markers. These markers have a matrix of black and white squares in the interior of the marker, and this barcode can have much lower optical frequency than templates. Using 2D-barcode markers.
Marker orientation
Tracking is also affected by the marker orientation relative to the camera. As the markers become more tilted and horizontal, less and less of the center patterns are visible and so the recognition becomes more unreliable.
Lighting conditions
Finally, the tracking results are also affected by lighting conditions. Overhead lights may create reflections and glare spots on a paper marker and so make it more difficult to find the marker square. Shadows can be cast across the paper, breaking up white areas in the camera image.
To reduce the glare patterns can be made from more non-reflective material. For example, by gluing black velvet fabric to a white base. The 'fuzzy' velvet paper available at craft shops also works very well.
To reduce shadows, use omnidirectional lighting (lighting conditions where light falls on the patterns from all directions.)