Debugging marker recognition problems
From ARToolworks support library
Main Page > ARToolKit Professional > Debugging marker recognition problems
ARToolKit has a flexible recognition pipeline, which allows it to work relatively well even with uncalibrated webcams, in a variety of lighting conditions, and with markers of poor quality. However, there are limits to this tolerance, and sometimes when tracking does not work optimally, you might be left wondering how to "debug" the tracking and address the most serious sources of problems.
This article focusses on the issue of marker recognition, particularly marker recognition when using barcode markers, or larger numbers of markers in a multi-marker set.
To help you achieve the best tracking results with multimarker sets and barcode markers,, and to see where and why ARToolKit cannot track in certain conditions, a new tool is provided with ARToolKit Professional v4.5. The tool is named simply check_id. check_id allows you to see the output of different stages of ARToolKit's tracking, and to determine visually why markers are not being tracked in certain circumstances. It also allows you to see the ID codes of barcode markers.
check_id does not solve problems with camera calibration. You still need to have a set of calibrated camera parameters for your camera.
Starting check_id
If you wish to examine only the recognition of the code on barcode markers, no configuration of check_id is necessary. If you also wish to display pose-estimates errors, OR you wish to check recognition of template markers, you will need to define a multi-marker configuration file first. By default, check_id reads it's multimarker configuration from the fileData/checkidMarkerConfig.dat. This is a standard multi-marker configuration file which can be edited with a text editor. In it, you declare the names of pattern files and/or barcode ID numbers, the size of each marker, and the offset and orientation of the marker relative to the origin of the multi-marker set. The pre-supplied version of this file is set to track the cube marker whose image is supplied in PDF form in doc/patterns/Cubes/cube00-05-a4.pdf / doc/patterns/Cubes/cube00-05-latter.pdf.
check_id is launched from the command line.
Windows:
check_id.exe
Mac OS X/Linux:
./check_id
Provided the configuration file is OK, check_id should launch and open a video window.
Using check_id
The initial mode is to display the distortion-corrected normal colour camera image. In the top-left of the window, the current thresholding mode (and threshold, if applicable) is displayed. Also, if a valid multi-marker set was loaded from Data/checkidMarkerConfig.dat, then additional indication will show whether robust multi-marker tracking is on or off.
check_id has a few modes which can be selected from the keyboard.
| Key | Function |
|---|---|
| ? or / | |
| q or [esc] | Quit program. |
| d | Activate / deactivate debug mode. |
| a | Toggle between available threshold modes. |
| - and + | Switch to manual threshold mode, and adjust threshhold up/down by 5. |
| r | Toggle robust multi-marker mode on/off. |
| c | Change arglDrawMode and arglTexmapMode. |
check_id begins processing each frame by performing the thresholding and square-recognition steps of ARToolKit's processing. These are the first and most basic steps in the detection of a marker and calculation of marker pose. We refer to "square-like" regions because at the earliest stages of ARToolKit processing, many regions in the incoming camera image can have shapes that approximate that of a marker. ARToolKit examines each of these shapes, performing various tests to check contrast, match the region to a pattern or to a barcode, to check that the region is planar, and so on. Only when all these tests have passed is the a marker ID returned and a pose-estimate calculated. check_id outlines all fully-identified markers with a red outline, and draws the pattern ID near the centre of the marker.
When a square-like region fails to pass some critical cut-off in the ARToolKit processing, check_id outlines that region in a different colour. The meaning of the colours can be seen while the program is running by pressing the '?' key twice. The colour of the outline gives an indication of what point of ARToolKit's processing the square-like region was discarded as a marker candidate (the "cutoff phase").
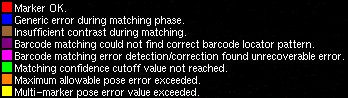
Not all cutoff phases are applicable to all markers. For example, the phases whose descriptions refer to "barcode..." are not applicable to pattern-based markers. The phases with "pose error" in the description apply only if a multi-marker configuration file has been correctly defined and loaded.
If you need to change the default check_id settings
The size of the marker border, and the pattern type settings can be adjusted from the command line. Running the utility with the --help option will show the various command-line options for adjusting the default settings. e.g. (Mac OS X/Linux):./check_id --helpor (Windows)
check_id.exe --help
The help text is reproduced here:
Usage: ./check_id [options] [Multimarker config. file [Multimarker config. file 2]]
Options:
  --vconf <video parameter for the camera>
  --cpara <camera parameter file for the camera>
  --borderSize f: specify the width of the pattern border, as a percentage
             of the marker width. Range (0.0 - 0.5) (not inclusive).
  --matrixCodeType k: specify the type of matrix code used, where k is one of:
             AR_MATRIX_CODE_3x3 AR_MATRIX_CODE_3x3_HAMMING63
             AR_MATRIX_CODE_3x3_PARITY65 AR_MATRIX_CODE_4x4
             AR_MATRIX_CODE_4x4_BCH_13_9_3 AR_MATRIX_CODE_4x4_BCH_13_5_5
  --labelingMode AR_LABELING_BLACK_REGION|AR_LABELING_WHITE_REGION
  --patternDetectionMode k: specify the pattern detection mode, where k is one
             of: AR_TEMPLATE_MATCHING_COLOR AR_TEMPLATE_MATCHING_MONO
             AR_MATRIX_CODE_DETECTION AR_TEMPLATE_MATCHING_COLOR_AND_MATRIX
             AR_TEMPLATE_MATCHING_MONO_AND_MATRIX
  -h -help --help: show this message