ARToolKit for Android Development
From ARToolworks support library
Main Page > ARToolKit Professional > ARToolKit for Android > ARToolKit for Android Development
Contents |
Developing with ARToolKitWrapper and ARBaseLib
Using the included ARToolKitWrapper native library and ARBaseLib Android library, it is simple to get an ARToolKit application up and running. Developers should refer to the ARSimple example included in the SDK as it is the most basic example and follows the development strategy described in this section.
ARWrapper
ARWrapper is a native C++ shared library that exposes a small set of functions for managing the lifecycle of an ARToolKit application, including initialization, adding markers, getting the projection matrix, querying transformations, and cleaning up at the end. Using JNI, these functions are mapped to a class within the ARBaseLib Android library so that they can be called from Java. The diagram below illustrates this.

The API documentation for ARWrapper can be found in the doc\apiref-ARWrapper\html directory. Open the index.html file inside that directory.
Assuming you start with a new Android application project in Eclipse, you will need to copy the built ARWrapper shared library into the project directory. Note that this step is performed automatically for the supplied ARToolKit for Android example projects.
You can copy the entire libs directory from: android/libs
Note: There are subdirectories for each CPU architecture, including armeabi, armeabi-v7a, mips and x86. It is the same library built for different instruction sets. The appropriate version is automatically chosen at runtime.
ARBaseLib
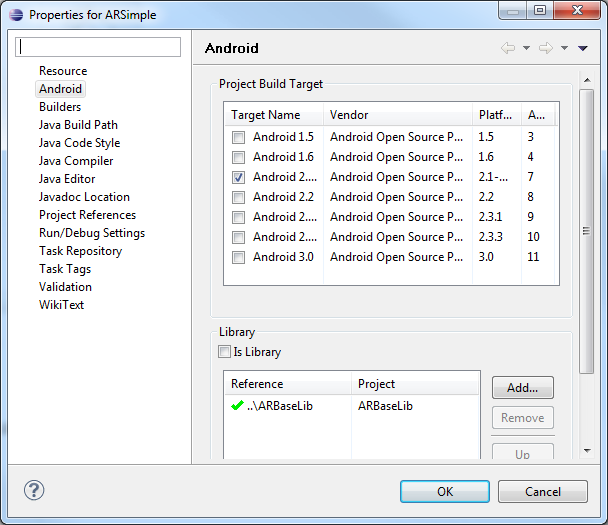
ARBaseLib provides additional classes to simplify development. ARBaseLib is an Android library, meaning that it isn't an Android application itself, but can make use of the Android framework. Android applications can reference the library, and Eclipse will take care of including the necessary files when the APK is built and deployed. This allows reusable components to be placed in the library and used in many different examples and applications. To use ARBaseLib, add the ARBaseLib project to your Eclipse workspace, and in the Android properties of your application, add a library reference, as shown below:
API documentation for the classes in ARBaseLib can be found in the EclipseProjects\ARBaseLib\doc directory.
Development
Referencing ARBaseLib gives the application access to several new classes. Some of the key ones are:
- ARToolKit: A singleton class that handles the native calls.
- ARActivity: A base class for an AR based activity.
- ARRenderer: A base class for rendering AR scenes.
ARActivity takes care of setting up the view hierarchy that will display the live augmented reality view. The AR view is created by layering an OpenGL surface over the live camera preview surface. By using a transparent background clear color in OpenGL, the live video shows through from below.
A FrameLayout is used to hold the views because children of a FrameLayout are stacked on top of each other – precisely the arrangement required. The following diagram illustrates how the user interface is composed to produce an AR view.
ARActivity must be subclassed to be used. Abstract methods need to be overridden in the subclass to provide ARActivity with the objects it needs to work with. The first object is a FrameLayout, mentioned above, which will contain the camera and OpenGL views.
protected abstract FrameLayout supplyFrameLayout();
To include a FrameLayout in the activity’s view hierarchy, edit the layout XML file for the activity. For example, the following layout includes a FrameLayout called mainLayout, set to be 640x480 pixels. mainLayout can be retrieved like any other view, via findViewById(), and returned from supplyFrameLayout(). Note that the actual view hierarchy may be much more complicated than the one presented here – you are free to place the AR FrameLayout within a more interesting GUI.
main.xml from ARSimple:
<?xml version="1.0" encoding="utf-8"?>
<LinearLayout xmlns:android="http://schemas.android.com/apk/res/android"
	android:id="@+id/topLayout"
	android:orientation="horizontal"
	android:layout_width="fill_parent"
	android:layout_height="fill_parent">

<FrameLayout
	android:id="@+id/mainLayout"
	android:orientation="vertical"
	android:layout_width="640px"
	android:layout_height="480px"/>

</LinearLayout>
The second required object is a renderer for displaying the AR scene. The renderer must inherit from ARRenderer, another class in ARBaseLib.
protected abstract ARRenderer supplyRenderer();
The source code from the ARSimple example activity is shown below. It implements both the necessary functions.
package com.artoolworks.ar.samples.ARSimple;

import com.artoolworks.ar.base.ARActivity;
import com.artoolworks.ar.base.rendering.ARRenderer;
import android.os.Bundle;
import android.widget.FrameLayout;

/**
 * A simple example of extending ARActivity to create a new AR application.
 */
public class ARSimple extends ARActivity {

	@Override
	public void onCreate(Bundle savedInstanceState) {
		super.onCreate(savedInstanceState);
		setContentView(R.layout.main);
	}

	/**
	 * Provide our own SimpleRenderer.
	 */
	@Override
	protected ARRenderer supplyRenderer() {
		return new SimpleRenderer();
	}

	/**
	 * Use the FrameLayout in this Activity's UI.
	 */
	@Override
	protected FrameLayout supplyFrameLayout() {
		return (FrameLayout)this.findViewById(R.id.mainLayout);
	}

}
ARRenderer is a baseclass for renderers of AR scenes. It is essentially a standard Android GLSurfaceView.Renderer, but adds some custom code and some methods which should be overridden by the subclass.
protected abstract void configureARScene();
This method is called on the renderer once initialization is complete. At this point, markers can be added, for example.
public void draw(GL10 gl);
This method is called when the rendering should be updated. ARActivity automatically only refreshes the renderer when the ARToolKit tracking has been updated. ARRenderer also performs checks to see that marker detection is up and running before calling draw. This ensures the ARToolKit projection matrix and markers are ready to be used during the rendering pass.
The source code from the SimpleRenderer used in the ARSimple example is shown below. When the configuration method is called, it adds a marker, recording its ID for later use. When the draw method is called, the ARToolKit object is used to retrieve the projection matrix, and query and retrieve tracking information for the loaded marker. OpenGL functions are then used to apply the matrices and display a cube on the marker (using a Cube utility class from ARBaseLib).
package com.artoolworks.ar.samples.ARSimple;

import javax.microedition.khronos.opengles.GL10;
import com.artoolworks.ar.base.ARToolKit;
import com.artoolworks.ar.base.rendering.ARRenderer;
import com.artoolworks.ar.base.rendering.Cube;

/**
 * A very simple Renderer that adds a marker and draws a cube on it.
 */
public class SimpleRenderer extends ARRenderer {

	private int markerID = -1;
	private Cube cube = new Cube(80.0f, 0.0f, 0.0f, 40.0f);

	/**
	 * Markers can be configured here.
	 */
	@Override
	public boolean configureARScene() {

		markerID = ARToolKit.getInstance().addMarker("single;/sdcard/AR/Data/patt.hiro;80");
		if (markerID < 0) return false;

		return true;
	}

	/**
	 * Override the draw function from ARRenderer.
	 */
	@Override
	public void draw(GL10 gl) {

		gl.glClear(GL10.GL_COLOR_BUFFER_BIT | GL10.GL_DEPTH_BUFFER_BIT);

		// Apply the ARToolKit projection matrix
		gl.glMatrixMode(GL10.GL_PROJECTION);
		gl.glLoadMatrixf(ARToolKit.getInstance().getProjectionMatrix(), 0);

		// If the marker is visible, apply its transformation, and draw a cube
		if (ARToolKit.getInstance().queryMarkerVisible(markerID)) {
			gl.glMatrixMode(GL10.GL_MODELVIEW);
			gl.glLoadMatrixf(ARToolKit.getInstance().queryMarkerTransformation(markerID), 0);
			cube.draw(gl);
		}

	}
}
Clearly much more complicated rendering can be achieved through more advanced OpenGL calls, or the use of a third-party rendering engine. The OpenGL rendering can occur in either Java or native C/C++, or even a combination of the two.
The ARSimpleNative example (and its accompanying native library ARWrapperNativeExample) demonstrates how to call into native code to perform essentially the same OpenGL rendering that ARSimple does in Java.
Additional Notes
Data Files
Data files used by ARToolKit include camera parameters, files with lists of markers, marker pattern files, NFT datasets, and 3D model files. You get these files into your app's filesystem by placing them in folders inside your projects "assets" folder. When your app runs, you make a call to ARBaseLib's AssetHelper class to unpack them (preferably just once, from an Application subclass). AssetHelper moves the assets from your application's .apk file into the application's cache on the internal storage. On subsequent launches, the assets are used from cache, saving time. Also, if space on the device is short, Android can clear this cache automatically, or the user manually. Finally, if the app is uninstalled, this space is reclaimed.
One rule needs to be observed: if the application's assets are changed, the "VersionCode" field (an integer) in the application's AndroidManifest.xml MUST be changed (usually incremented).
The ARToolKit for Android examples provide working example code. The following code (from ARSimple's ARSimpleApplication.java class) demonstrates the unpacking of one folder, "Data" into the cache on the filesystem.
    // Here we do one-off initialisation which should apply to all activities
	// in the application.
    protected void initializeInstance() {

		// Unpack assets to cache directory so native library can read them.
    	// N.B.: If contents of assets folder changes, be sure to increment the
    	// versionCode integer in the AndroidManifest.xml file.
		AssetHelper assetHelper = new AssetHelper(getAssets());
		assetHelper.cacheAssetFolder(getInstance(), "Data");
    }
Loading Markers
The method to add a marker takes a marker configuration string, which is simply a semicolon-separated list of fields that describe the marker to load. The syntax is:
- For single markers: single;path_to_pattern_file;pattern_width
Example: single;/sdcard/AR/Data/patt.hiro;80
- For multi markers: multi;path_to_multi_config_file
Example: multi;/sdcard/AR/Data/multi/marker.dat
int markerID = ARToolKit.getInstance().addMarker("single;/sdcard/AR/Data/patt.hiro;80");
Application Permissions
In order to access the camera the application requires permissions which are set in the AndroidManifest.xml file. Ensure these are set correctly.
<uses-permission android:name="android.permission.CAMERA" />
<uses-feature android:name="android.hardware.camera" />
<uses-feature android:name="android.hardware.camera.autofocus" />
Application Configuration
There is an issue where ARActivity initializes more than once when the orientation changes to landscape. To fix this set the configChanges field for the application in the AndroidManifest.xml file as shown:
<application
    	android:icon="@drawable/icon"
    	android:label="@string/app_name"
    	android:configChanges="keyboardHidden|orientation" >
Developing directly with ARToolKit
For developers who want more control and direct access to ARToolKit functions, the core ARToolKit modules are available as static libraries:
- libar: core AR functions
- libaricp: Iterative Closest Point functions (provided as prebuilt binary only)
- libarmulti: multimarker support
- libeden: additional math and rendering functions
- libgl: OpenGL functions, particularly for video texturing
These static libs (.a files) are provided prebuilt in ARToolKit\android\jni\prebuilt, or if the ARToolKit library is rebuilt, the latest versions will be created in ARToolKit\android\obj\local.
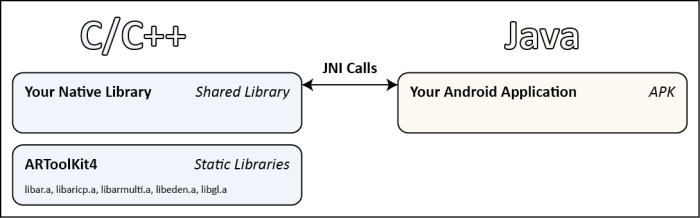
By referencing these static libraries, a native Android shared library can be created that directly calls ARToolKit using its standard C API. Then, by exposing JNI compatible functions from within that library, the developer can access their native code from the Java code in their Android application. This approach is exactly how the C++ wrapper included in the SDK operates.
Note that the entire ARToolKit API is not exposed to Java. Instead, implement ARToolKit functions in C/C++ and call these functions as needed from Java. The following diagram illustrates this approach.
ARNative Example
The ARNative example (and its accompanying native library libARNative) demonstrate how to create a shared library, expose functions via JNI, and call them from an Android activity. It does not use either ARToolKitWrapper or ARBaseLib, so is the closest example to a “standard” ARToolKit application in the SDK.
Rather than combining Android camera and OpenGL views to synthesize an AR view, ARNative uses texture mapping to display the video background, using standard ARToolKit functions. However, the camera preview surface must still be placed in the activity’s view hierarchy to permit video capture. The preview can be hidden from view under the OpenGL surface however.